Floor sanding and polishing are important processes that give your home a new look. Wooden floors typically get faded or damaged over time, so sanding and polishing your floors is an excellent solution. Not only does this process give your floor a perfect finish, but it also provides a healthier environment for you and your family. You can also use this service to change the look of your stairs or the whole room. This process can make your house look like a new one.
 You must first lift the carpet at the edges to sand a floor. Use a floor stripper to remove the carpet. Then, nail loose boards into place with a nail gun. Once the nails are buried, sand the floor and polish it. Fill holes with wood filler and dry them before polishing the floor. This step will ensure that the floor looks flat and has no visible imperfections.
Before sanding your floor, remove all pieces of furniture in the room. This includes any built-in cupboards. If you have a wooden floor, you must remove it completely. It may contain tacks and staples, so it is important to make sure that these are removed. You can also use a water-based putty to fill in a hole that’s already in the floor.
Once you have completed the floor sanding step, you can polish your floor. Before doing this, make sure that the water supply is not blocked. Once you have sanded the floor, you need to clean the entire surface thoroughly. To do this, you will need access to a spray bottle of water. You’ll need to have a free water source to clean the floors.
Before floor sanding and polishing Adelaide, you must clean the floor thoroughly. It is important to remove any nails, screws, or other materials from the floor before polishing. If your floor is made of wood, there are many nails and screws that you must remove. Then, you must apply several coats of varnish, lacquer, or wax to protect it. Then, you need to wait 24 hours before you walk on it.
The sanding process is a necessary step in floor resurfacing. Depending on the size of the room and the condition of the floor, sanding can take anywhere from a few hours to several days. However, it is important to note that the sanding process will depend on how badly scarred your floor is and what finish you want to achieve. It will also depend on the temperature and the type of finish you choose.
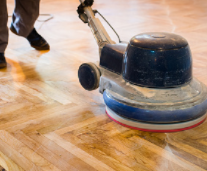
The next step in floor sanding and polishing is to apply the finish coat of varnish or coating. This process is very important, as it will create a smooth finish and make it easier to work on. Once the coating has been applied, it is time to polish the floor with a polishing machine. This process is done in two phases. The first step is the sanding process. The second stage is the polishing phase.
When floor sanding and polishing, it is essential to clear the area. Before the sanding process, make sure that the room is free of carpet and furniture. This will allow the sanding process to begin. The finishing process will require some preparation work, but the final results are worth it. It is important to hire a professional who can do the job properly. You do not want to end up with a floor that is not up to par with your expectations.
If you have your floor sanded and polished, it is vital to remove the carpet and any other furnishings. You may need to remove built-in cupboards and furniture. Then, you can start sanding and polishing your floor. Doing this project yourself will take at least two days if you are doing this project yourself. The next step is to choose the colour of your floor. You can find a wide range of colours and finishes at floor sanding and polishing Adelaide.